 |
|
|
|
|
 |
|
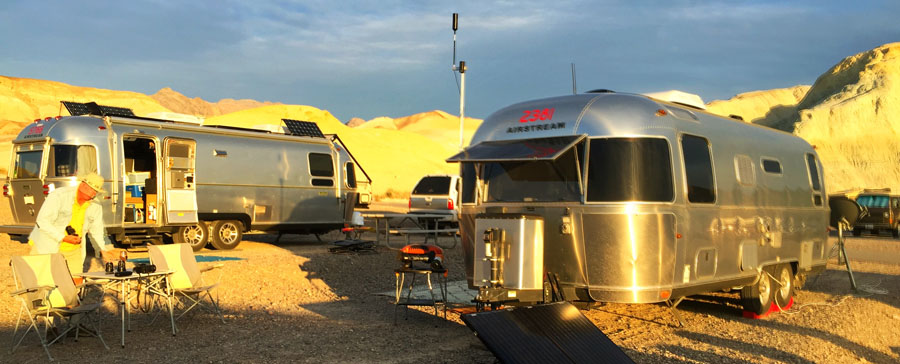
Setting up our Airstream rigs in Death Valley for solar energy capture and enhanced communications |
|
|
|
|
|
|
|
September 2020 -
Best low cost Airstream modifications
|
|
|
|
|
|
|
|
I’ve been a tinkerer all my life starting as an 11 year old at boarding school, making balsa model airplanes, canvas covered kayaks, tube powered AM pirate radio stations, just the sort of thing bored school kids get into! That didn’t stop when we bought our first boat, a 30 ft Iroquois catamaran which needed extensive renovation and enhancements. After we moved to Virginia we bought an S2 sailboat and put it into charter service and made loads of improvements. Needless to say when we gave up sailing and started Airstreaming it was an irresistible lure to improve our travel-trailer!
We discovered Airstreams in Florida while we were making an east coast trip visiting multiple Grand Banks trawlers for sale which was our intended post retirement travel lifestyle. Within two months we were hooked and bought our 2015 25 ft Flying Cloud RB new from Patrick at Colonial Airstream in New Jersey in a whirlwind of excitement and anticipation to start our new life on the road!
With sail or power boats out of our lives, my tinkering skills turned to the Airstream - little did the Flying Cloud know what was in store for it! Over the six years we have made over a hundred modifications or tweaks to our Airstream rig and these are documented and indexed - check the link at the end of this article. In a previous article we worked through a dozen projects considered to be most useful enhancements to our Airstream life and some of these were quite expensive. For this article I’ve selected a dozen or so projects that actually cost very little or nothing and I’m thinking you would probably get change from a $20 bill. One guideline we have always kept in mind is not to make any modification that would adversely affect the resale value of our rig.
Most of these tweaks use materials – wood, plastics, plexiglass, stainless steel bar and sheet - left over from various past projects. Our kitchen remodeling in light oak left us with a vast amount of solid oak and oak faced plywood with a finish that is very similar to the Airstream factory installed bleached wood trim. Additionally some basic electrical, woodworking and metalwork skills along with adequate tools are needed to accomplish some aspects of these projects.
For the sake of clarity and reference the #numbers roughly correspond to the sequence of implementation but more importantly are used throughout the index and on the FaceBook page AirstreamTweaks. There are additional notes, comments and detailed photos on the FaceBook posts.
| |
|
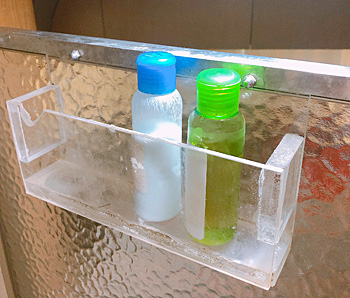
#04: To avoid clutter of shampoo, shower gel bottles and dispensers inside the shower we built a plexiglass holder (approx 9" long, 4" high and 2" width) to hold about 5 travel size dispenser plastic bottles. We bolted the bottle holder to a foot long section of aluminum channel (3/4" wide by 1/2" deep) which fits exactly over the top of the shower door. We used plexiglass off-cuts and a little plexiglass glue solvent to assemble!
|
|
 |
|
|
|
|
|
|
|
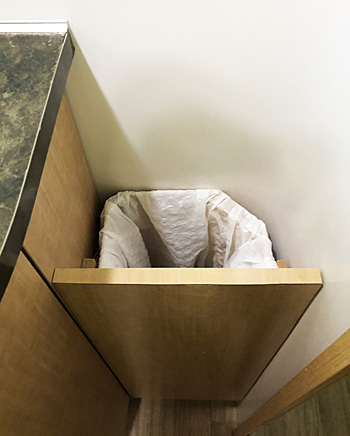
#06: Trash bin that don't use up valuable space! Not all Airstreams may have this wasted space opportunity but our FC25 bathroom has a 9" wide by 6" deep space between the bathroom vanity and the door. We cut a 24" high by 9" wide front panel with an internal shelf that supports a plywood tube that holds a plastic trash bag - it has enough capacity to last a couple of weeks.
|
|
 |
|
|
|
|
|
|
|
#13: Unused space in the bottom rear of the main closet makes a useful location to build a bottle (mostly wine) rack. We added a central divider to prevent bottles crashing around under acceleration or braking. This unit is built in seven pieces without any fastenings or glue and slots together in situ since closet door width is narrower than the full width of the rack in the closet.
|
|
 |
|
|
|
|
|
|
|
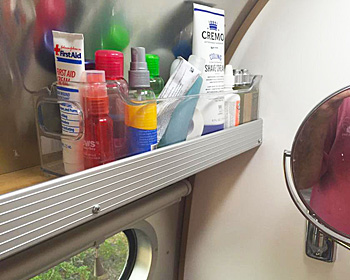
#15: Freezer organizer trays from Target make keeping toiletries easier to control. His and Her set! They store nicely on the shelf in the bathroom and don't leap out under way. When you get to your destination they can be brought down to the counter for easy access. You may have to trim one side of the tray so that it will fit on the shelf and allow for the curvature in the wall of the Airstream.
|
|
 |
|
|
|
|
|
|
|
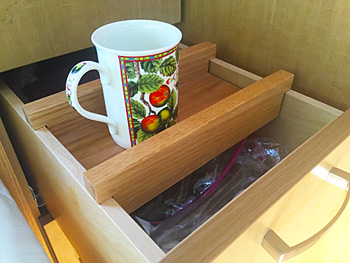
#17: Simple way to provide a small bedside table when your side of the bed (happens to be my wife's side!) only has drawers. This oak shelf is made from 1/2" board for the base and 3/4" board for the cross pieces and sits on and slides on the sides of the drawer. Added benefit it does not have to be removed when the drawer is closed. You can make it wider, this one is 4 inches wide, enough for the essentials of life - a cup of coffee and your iBook, iPad or phone.
|
|
 |
|
|
|
|
|
|
|
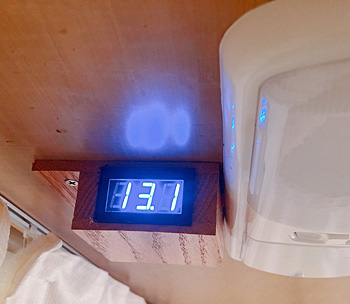
#33: Installed a small digital voltmeter on the underneath of the overhead cabinet above the dinette. Now we can monitor our solar charged batteries at a glance! We made a connection from the 12 volt supply to the LED light.
|
|
 |
|
|
|
|
|
|
|
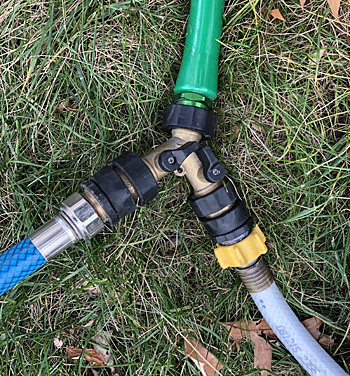
#38: Love these hose quick disconnects for speedy hookup and tear down - just push the connector in and ready to go. You still need to do the faucet and AS hoses but “Y” hose splitters and water filters are just a click away. The second advantage is hoses can be stored without draining and spilling into your storage compartments just by connecting the hose back to itself. These connectors do not mix well between brands so go with one source.
|
|
 |
|
|
|
|
|
|
|
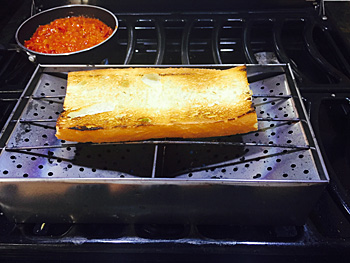
#55: Best thing since sliced bread! My Chinese stove top toaster, no moving parts, speedy startup and toasting, controllable roasting levels, can do two slices side by side all for $16. We enjoy the toaster most mornings but it does have a tendency to test the smoke alarm!
|
|
 |
|
|
|
|
|
|
|
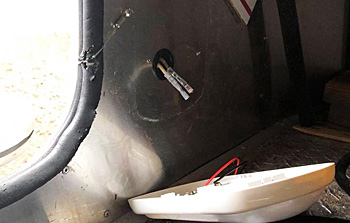
#57: Decided once and for all to remove the risk of accidentally running down the batteries by removing the two external storage compartment lights. I can count on two hands how many times I’ve discovered that these lights have accidentally turned themselves on by having items move around in the compartments in travel or items brush across the exposed slide switch while storing or unloading. In daylight you can’t tell they are on! At night a glow from under the settee gives you a clue! So I just removed the lamp units - you can’t remove the LED bulb as it’s built in - and cut the wires as close to the connector, electrical taped both ends, and pushed them back between the hulls. I’m pretty sure we can retrieve them one day if we change our minds!
|
|
 |
|
|
|
|
|
|
|
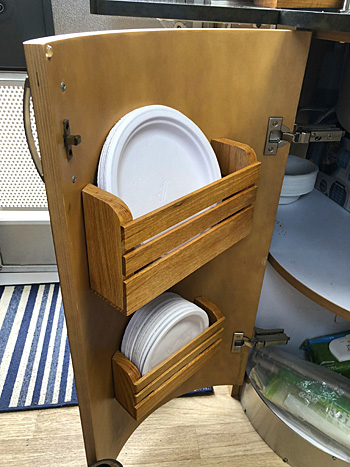
#61: Frustration with under the sink storage pushed me to reconsider how we stored medium and large paper plates! Designed two plate holder racks that are mounted inside the curved doors and offer immediate and easy access to both plate sizes. As the cabinet door closes, the racks do encroach a few inches on the shelf space but it’s a worthy trade for the convenience! Built with 1/4” and 3/4” oak board. Uses the Kreg pocket hole system to attach to door.
|
|
 |
|
|
|
|
|
|
|
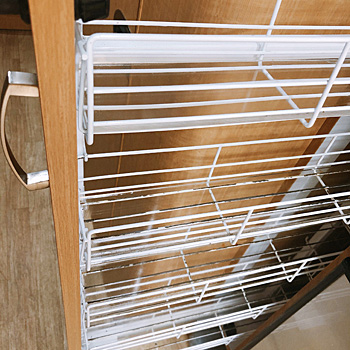
#70: Decided to upgrade the wire pantry shelf baskets and insert a thin plexiglass bottom sheet to avoid scuffing and scraping of the wire baskets. Cut some 3/32” plexiglass into 21” x 3-7/16” sheets that just drop right in to the base of the wire basket. Cut a few extras sheets for replacements down the road. Also ordered an additional basket from Out-of-Doors Mart to add to the slide-out pantry levels giving us five levels of baskets total and decided to store the taller awkward items elsewhere thereby making better storage density use of the restricted shelf height clearance.
|
|
 |
|
|
|
|
|
|
|
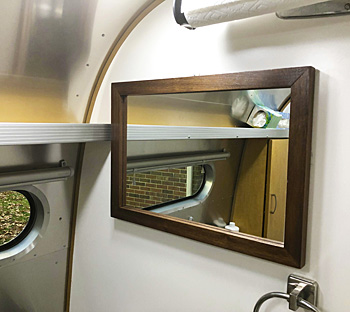
#71: I don’t know why we have tolerated this basic bathroom mirror for three years! I guess there were other higher priorities! Recently I acquired a great collection of hardwoods so I ripped some black walnut and made a frame that would optimally use up the 20” x 14” wall space above the bathroom sink. Used recessed key hole hangers but also opted for a small central white polyester block (virtually invisible!) along the top edge of the frame to prevent Louisiana I-10 shake rattle and jump off the wall action!
|
|
 |
|
|
|
|
|
|
|
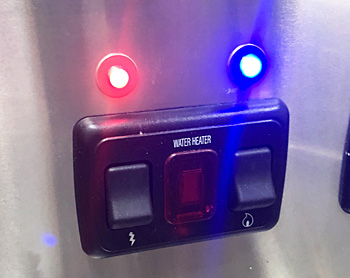
#88: Water heater 12 volt LED’s - It’s important to be able to tell with a casual glance whether a device is on or off. Similarly I like being visually alerted if a device is on when it shouldn’t be! Used red LED for electric water heater and blue LED for propane water heater.
|
|
 |
|
|
|
|
|
|
|
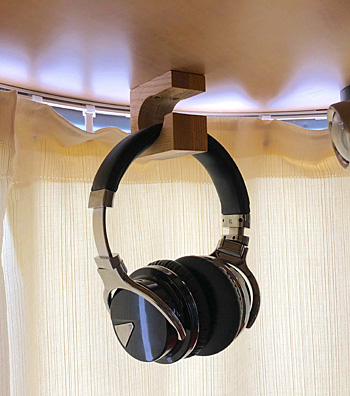
#93: Headphone hooks for his and her headphone storage. Cross-laminated two pieces of 3/4” oak and used a hole saw to drill the main circle, then a band saw to cut the access slot. Easy reach from bed, safe go-to storage location and can be charged by USB cable in situ.
|
|
 |
|
|
|
|
|
|
|
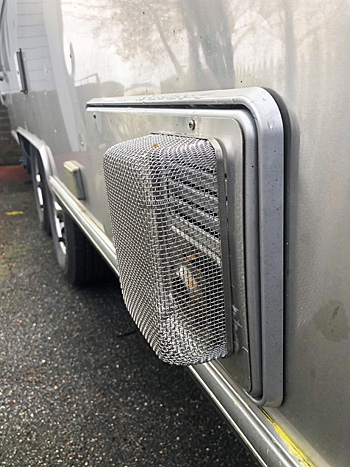
#104: Furnace failures seem to occur almost annually and the predominant reason is mud daubers building their mud nest in the unit. The mud daubers are a long slender wasp about a half to one inch in length. As part of the annual maintenance my Airstream guru technician DJ Mastin of Broken Rivets fitted a spring retainer stainless wire screen (mesh about 3/32”) over the furnace air intake/exhaust which should give us a better chance to prevent another tedious mud dauber reoccurrence.
|
|
 |
|
|
|
|
|
|
|
#105: Breakaway coiled cable - Another great suggestion from my Airstream guru service guy DJ Mastin of Broken Rivets RV in Ashland VA who replaced my factory installed single 4 ft wire with this nifty coiled breakaway cable. Until now I had taken the long wire from the switch through the last link of a stainless steel chain hanging from the RAM’s chassis, and returned it to a carabineer clip on the breakaway switch. This makes the hookup / unhook operation pretty easy and avoids untidy wire storage issues when not in use.
|
|
 |
|
|
|
|
|
|
|
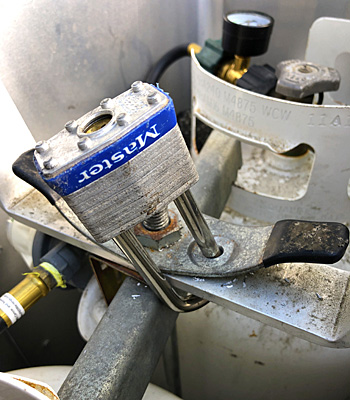
#108: Upgraded my propane tank locking system to use a standard Master long loop padlock. Drilled a 3/8” hole through both the securing strap and the lock down wing nut to provide a secure and relatively difficult to circumvent theft protection arrangement.
|
|
 |
|
|
|
|
|
|
|
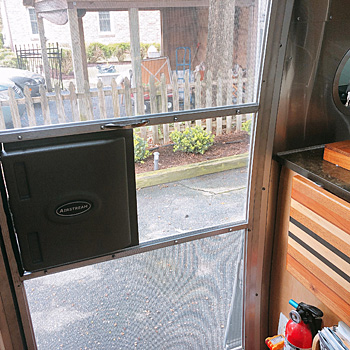
#113: Plexiglass panel in screen door - some time back I removed the aluminum grills that protect the mesh on the screen door. This time we decided to replace the ugly solid aluminum door panel with plexiglass to give more light and improve the view. Installed two 1” wide x 1/8” aluminum strips to create a sturdy channel for the plexiglass panel. Polished the strips with tripoli polish on the buffer. Eventually the plastic slider panel will be replaced for complete transparency! Note if you are a dog owner I would definitely keep the lower internal screen door grills in place!
|
|
 |
|
|
|
|
|
|
|
|
|
|
|
|
Hopefully these tweaks will start you thinking along the lines of how you can improve the comfort and efficiency of living in your rig without breaking the bank. Check out the full index of Airstream modifications at www.db26.net/airstream/201800-tweaks-cat.htm
Margaret & David Broad (WBCCI #2381) from Tappahannock, Virginia, traveling 8 months of the year since July 2016 in their 2015 Flying Cloud 25 RB Nuage Volant. We belong to the Virginia Airstream Club #109 and are affiliated with Club Airstream Quebec #125 and with the South Eastern Camping Unit #010. You can email questions or comments to airstream@db26.net Our travel blog is at www.flyingcloud25.blogspot.com and David also publishes an Airstream improvement page at www.facebook.com/airstreamtweaks and for fun created a Gourmet Camping group at https://www.facebook.com/groups/gourmetcamping
|
 |
|
|
|
|
|