February 2019 - Airstream custom drawer cabinet
After a couple of years Airstreaming, one comes to the realization that you are never ever going to pack six sleepy bodies into those bunks for an overnight! If you do overnight with two guests, the dinette drop down will handle it! So without any reluctance whatsoever we decided to remodel the Flying Cloud 25 RB eight foot port dinette berth with its integral pull out berth extension into a new set of drawers two feet wide and expand our culinary capabilities and storage by at least 200%.There is always a lot of pondering and agonizing when considering cutting any part of the original Airstream! Am I making a terrible mistake? Am I damaging my resale value? Will I be able to reverse my sacrilege? At last year’s International in Salem OR, an outfit called Ultimate Airstream showed off their modifications including a similar drawer unit, so we decided it was time to proceed with Airstream surgery and replicate their multi thousand dollar modification.
To be fair and honest, my woodworking skills have been developed and honed since I started shop classes at boarding school six decades ago. Our last major project was a complete kitchen design and rebuild for the house we moved to when we both stopped working full-time.
First decision was width. Cutting the eight-foot dinette berth to six-foot was reasonable, and that gave us a two-foot drawer width to work with. My self indulgent relaxation watching a movie was still intact and maybe even improved since the six-foot fixed length would prevent my posture from gradually sliding into a horizontal slouch! For height we selected exactly the same height as the kitchen counter, which allows the TV to stay in its location. Next we decided on the number of drawers, but that really requires you to decide what you will keep in those drawers and that involves thinking about how you cook, what supplies you like to have to hand, and what items you wished you had onboard to improve the culinary activities.
Although we lost one smaller under berth storage area we have gained six cubic feet of storage in 5 drawers which allows us to bring together in one central location a lot of miscellaneous items stored in various nooks and crannies. It makes for a coherent and tidy storage solution for items we once stored under the bed, in towels, in foam, under the sink and wherever was opportune at the moment.
Our design plan resulted in five drawers, one deep 7” drawer to hold 15 of the OXO storage containers with lockable lids located fourth in the drawer stack. The upper three drawers we designed to be shallow; the first to hold a full cutlery array in a 24” x 24” x 2” drawer. The second drawer we designated for spice jars laying on their side, and the third drawer we loaded up with laptops and larger format books and map atlases. The fourth level holds the deep containers and the fifth also has a deep matching front but could only house a shallow internal drawer owing to the clearance required for the inverter and internal wiring at floor level.
Using Blum soft-closing undermount drawer slides, we developed a spreadsheet of the vertical and horizontal dimensions. This is essential due to the very tight Blum specifications, requiring cuts accurate to 1/32”. Using the dimensions of the objects we wished to store at each level we could add drawer floor thickness, under drawer clearance, internal support cross members, and top of drawer clearance allowance to build the stack to the full 32-1/2” height. Some trial and error was needed to meet all our requirements, shaving an 1/8” here and adding somewhere else. All four shallow drawers were designed to be identical in order to set up jigs, lock settings and stops on our radial arm saw for speedier production cutting. To be truthful I did make a prototype inner drawer from cheap wood which proved to be a wise move as I discovered the drawer slide vendor had mixed two almost identical slide models with different drawer wall thicknesses on my order!
Removing the bunk extension and old berth slides was easy, and neat jigsaw cuts were used to cut the existing berth supports both front and back. We decided to remove the 1 KW inverter completely and replace it with a Magnum 2 KW to be located in a new compartment under the dinette so that released extra height for the drawer stack. The good news with the inverter upgrade is the heavier gauge battery cables have a much shorter distance to travel, but the bad news is the result of moving a heavy weight nearer the tongue impacts trailer weight balance.
In parallel activities the four-foot port berth cushion was taken to an upholstery shop and reduced to two-foot to fit perfectly in the new berth.
Two side panels were prepared out of 3/4” ply, and, because of the depth of the unit, an extra 6” oak front end was butt glued with internal dowels to the 24” ply sides. These needed contouring to the Airstream hull using multiple jigsaw passes and fine tuning to get a good match, although the rear edges remain out of sight so absolute accuracy was not critical! What is critical is the color of the oak and a two part Zinsser oak bleaching process was used to match the original Airstream oak trim with very successful results! Finally Artisan Gold laminate (as used by Airstream) from Wilson Art was ordered and applied to the top exposed part of the side panel facing the settee berth.
At this point you realize the unit has to be built in place since the Airstream door is much too narrow for the fully built unit to be moved in! So the full unit was built in my workshop and tested, dismantled and reassembled in the Airstream.
Very accurately the drawer slides are mounted on the side panels using a self-centering drill to avoid drift. Once all ten slides are mounted, cross members that accurately maintain the width are put in place. These oak cross bars have been again bleached and drilled using the Kreg pocket hole system so that the screws are positioned accurately and to the precise depth. We always use hexagonal Torx drive screws or square drive pocket screws to allow for multiple assembly, disassembly and reassembly.
With the drawers installed on their slides and hopefully operating smoothly, we can turn our attention to two further steps of this project: making the drawer fronts that overlap the side panel front edge European style and considering the use of the space between the drawers and the outer skin of the Airstream. The space available 24” x 5” wide x 14” depth lends itself to the storage of up to five or six bottles stored vertically, and this requires a novel counter top modification.
For drawer fronts we used 1/2” oak again bleached using the two-part solution. Apply solution A to the wood using a sponge brush, wait ten minutes and apply solution B. Leave it to dry for a day, sand it and apply multiple coats of lacquer spray using a short interval spray which allows multiple coats over a couple of hours. For drawer pulls we opted for long pulls that have rounded ends. The most common long drawer pulls have open extended ends that continually snag my clothing!
The bottle storage can be easily assembled using a bottom shelf and an internal panel, either adding vertical separator panels if storing glass bottles or, if you alternate plastic and glass bottles, the problem solves itself.
Lastly the counter top is ready for construction. We wanted it to be flush with the front of the top drawer and maybe overlap the berth side by a maximum of 1/4”. We opted for a 1/2” plywood base with multi-colored 1/2” wood strips glued in a repeating pattern. We used a mix of wood types - mostly offcuts from previous projects - including cherry, maple, redheart, black palm, zebrawood and ebony strips alternating in light and dark shades and made the final edge piece in 1” black walnut to hide the plywood base.
The last twist will be to construct a hatch at the rear of the counter top unit to provide a discreet removable access door to the tall bottles of olive oil, balsamic vinegars, liquor and wines!
A lot of planning went into the design of this five-drawer unit, and it was definitely custom-built to meet our storage requirements and the quirkiness of the Airstream hull. Fortunately a lifetime of boat ownership and many marine woodworking projects had given me skills to be comfortable with this project. The only aspect I would have liked to change would be to lighten the weight of the cabinet end pieces and the drawer slides.
During our 1,200 mile shake-down trip to the Keys we monitored the new drawer installation at each stop. Unfortunately the Blum soft close is not strong enough to retain the drawers closed against the centrifugal forces generated in a rapid right turn so bungee cords were applied temporarily to keep the unit closed. The remedy is placing cabinet magnets on the back wall of the drawer requiring a much higher break away force to open the draw. One other modification was securing the Blum underdrawer locking devices with vertical nuts and bolts with Loctite since the horizontal screws originally fitted tended to fall out due to the travel vibration.
Excluding my labor of love the finished project came in at less than 1/10th of the ultimate Airstream tag!
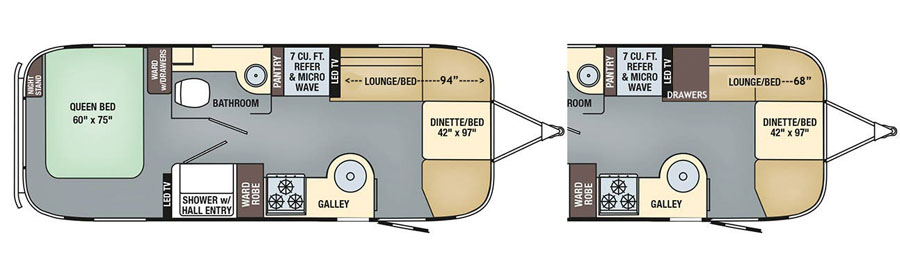
Standard Flying Cloud 25 berth configuration – note slide out berth below cushions
Configuration after drawer unit install – note the existing floor cabinet door will be replaced with a full height panel
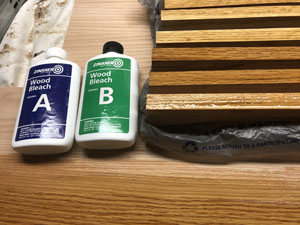
Testing different bleaches – Zinsser two part wood bleach proved successful
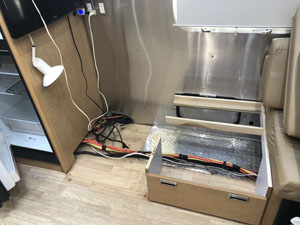
Removal of berth slide-out and inverter, and truncating the base frame
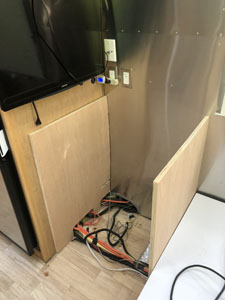
Test fitting the cabinet end panels and customizing to the Airstream hull shape
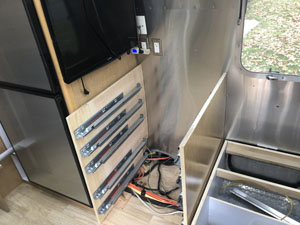
Addition of Blum slides to the end panels
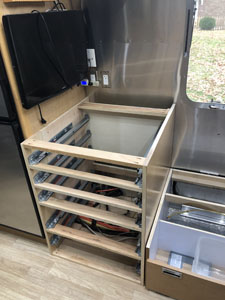
Fitting the support members that lock in the drawer unit width
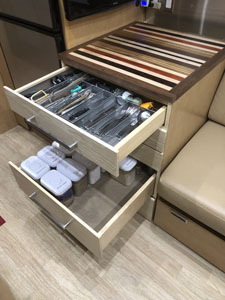
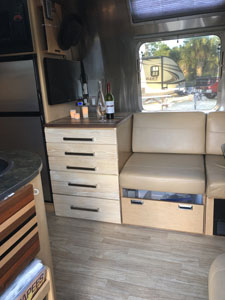
Fitting the exotic wood block counter top and the drawers
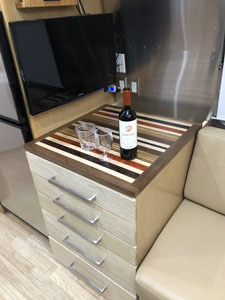
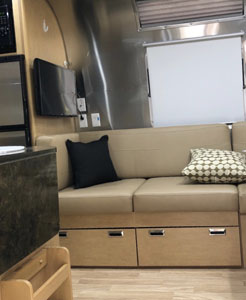
Final unit – note bottle rack in rear will have a black walnut panel cover
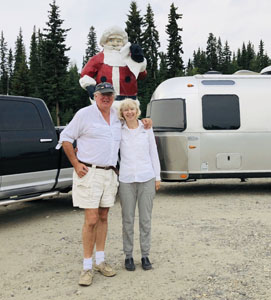 Margaret & David Broad (WBCCI #2381) from Tappahannock Virginia, traveling 8 months of the year since July 2016 in their 2015 Flying Cloud 25 RB. You can email questions or comments to airstream@db26.net Their travel blog is at www.flyingcloud25.blogspot.com and David also publishes an Airstream improvement page at www.facebook.com/airstreamtweaks On the road to Fairbanks, Alaska a deliberately enticing community called North Pole AK 99705 draws your attention much like an outlet mall. Store after store offers every conceivable Christmas decoration or gift including Airstream Christmas tree ornaments. And yes there is a US Post Office which focuses on handling all of Santa’s mail! You can mail your own Santa letter to the North Pole USPS facility and they will mail it back to the child with the official North Pole postmark! David & Margaret Broad at the North Pole Alaska! |